Showing posts with label DIY. Show all posts

12.16.2015

First Birthday Party Prep


Of course I'm going crazy over here planning Camden's first birthday party!

Did you expect any less? 

My baby only turns 1 once! His party is a little over 3 weeks away, so with Christmas next week I wanted to make sure I got a good start on things. Without spoiling all the details completely, this picture gives a little sneak peek into the theme. Any ideas on what it could be?! I'm so excited! I literally searched, and searched, and searched, for months on Pinterest for a theme I liked and that (most importantly) fit Camden's personality. The invites are going out tomorrow and the menu has pretty much been planned, so now it's just getting all the little details ready!

I can't wait to share more, but just forgive me if I'm a little MIA here and there over the next couple weeks. Luckily, it's all fun stuff taking up my time. :)

Also, this is completely unrelated to his birthday party, but have you seen the baby ornaments with their hospital hat, wristband, etc. inside all over Pinterest? It was too cute of an idea to pass up and took me less than 5 minutes to put together.

I bought a clear ornament from the Dollar Store and put his hat, wristband, and birth announcement from our local newspaper inside. I LOVE how it turned out!

(after I took this picture I added a cute white bow around the top to make it a little more fancy!)

If you have a little one, this is such a special (and easy) way to incorporate the day they were born.

Happy hump day, you guys!

7.07.2014

DIY Painted Glass Vases {$100 Gift Card!}


I've come to realize over the years since becoming a homeowner that painting doesn't always have to be thought of as such a draining task, and it also doesn't always mean time consuming. At first, I dreaded painting anything in our home simply because I had this idea that it would be horrible, but I was wrong and I've grown to love it (as I'm sure you've noticed with all my crazy DIY projects!) because of how easy it is to transform even the smallest of items in your home that result in dramatic differences.

I love being able to put my own creative touch on items in our home to fit our style and it's so easy to do so by just adding a couple coats of paint. Giving something a complete makeover by just adding some paint and being done within a couple of hours? Count me in.

 
before their pretty makeover...
Much like how most of my projects start, I first turned to Pinterest because I have been hoarding this collection of clear vases and wanted to try and get some color inspiration for giving them a makeover with my favorite Glidden paint (the swatches are easy to pick from and color goes on smoothly). I was pretty much sold on a gold + turquoise blue combination for these vases after pinning only a few items that inspired me (you can see my full board full of inspiration for this project here).

So, my newest project was born: DIY Painted Glass Vases!
I promise that any of you can do this project, and your new pretty vases will be so happy you did! They are just begging for a makeover. 

You will need:
-Clear vases of your preference (mason jars would be great too!)
-Plastic cup
-Glidden paint (my personal preference because of their color selection-you can purchase at Home Depot) 
-Clear lacquer

Step 1: Instead of brushing the inside of the vases, we used a swirl and coat method. Pour the paint in the bottom of your glass container.

Step 2: Tilt the glass from side to side and let the paint swirl around in the vase until you get it completely covered. You can turn the vase upside down and use the plastic cup to let any excess paint drip out.


Step 3: Allow your vase to drain upside down on a paper towel (I recommend doing this somewhere outside for obvious reasons) and make sure you wipe off any paint that may have got on the outside part of the glass.

Step 4:
Place vase upright again to let dry in a warm area. Check your paint can for drying time. Once the inside is completely dry, spray a water-based lacquer over the painted area to protect it. You won't want to miss this step if you plan on putting any kind of liquid inside!


From here, all you need is some fresh flowers and voila!


At the last minute since I loved using these Glidden paint colors so much I decided to spruce up some old ceramic planting pots I had in our garage. I just wiped them down first with a wet paper towel and then painted them with a foam paintbrush... easy, 10 minute project!


And last but not least, if you aren't wanting to keep your vases outside, you can always style them inside. I love how these vases look in our family room, much more appealing than the old clear ones!


*Now since you all just listened to me ramble on and on about paint, tell me what you enjoy painting the most in your home and you will be entered to win $100 Visa Gift Card!

Sweepstakes Rules:
No duplicate comments.
You may receive (2) total entries by selecting from the following entry methods:
  1. Leave a comment in response to the sweepstakes prompt on this post
  2. Tweet (public message) about this promotion; including exactly the following unique term in your tweet message: “#SweepstakesEntry”; and leave the URL to that tweet in a comment on this post
  3. Blog about this promotion, including a disclosure that you are receiving a sweepstakes entry in exchange for writing the blog post, and leave the URL to that post in a comment on this post
  4. For those with no Twitter or blog, read the official rules to learn about an alternate form of entry.
This giveaway is open to US Residents age 18 or older. Winners will be selected via random draw, and will be notified by e-mail. The notification email will come directly from BlogHer via the sweeps@blogher email address. You will have 72 hours to respond; otherwise a new winner will be selected.
The Official Rules are available here.
This sweepstakes runs from 7/7/14-8/18/14.
Be sure to visit the Glidden Paint brand page on BlogHer.com where you can read other bloggers’ posts.
 

4.22.2014

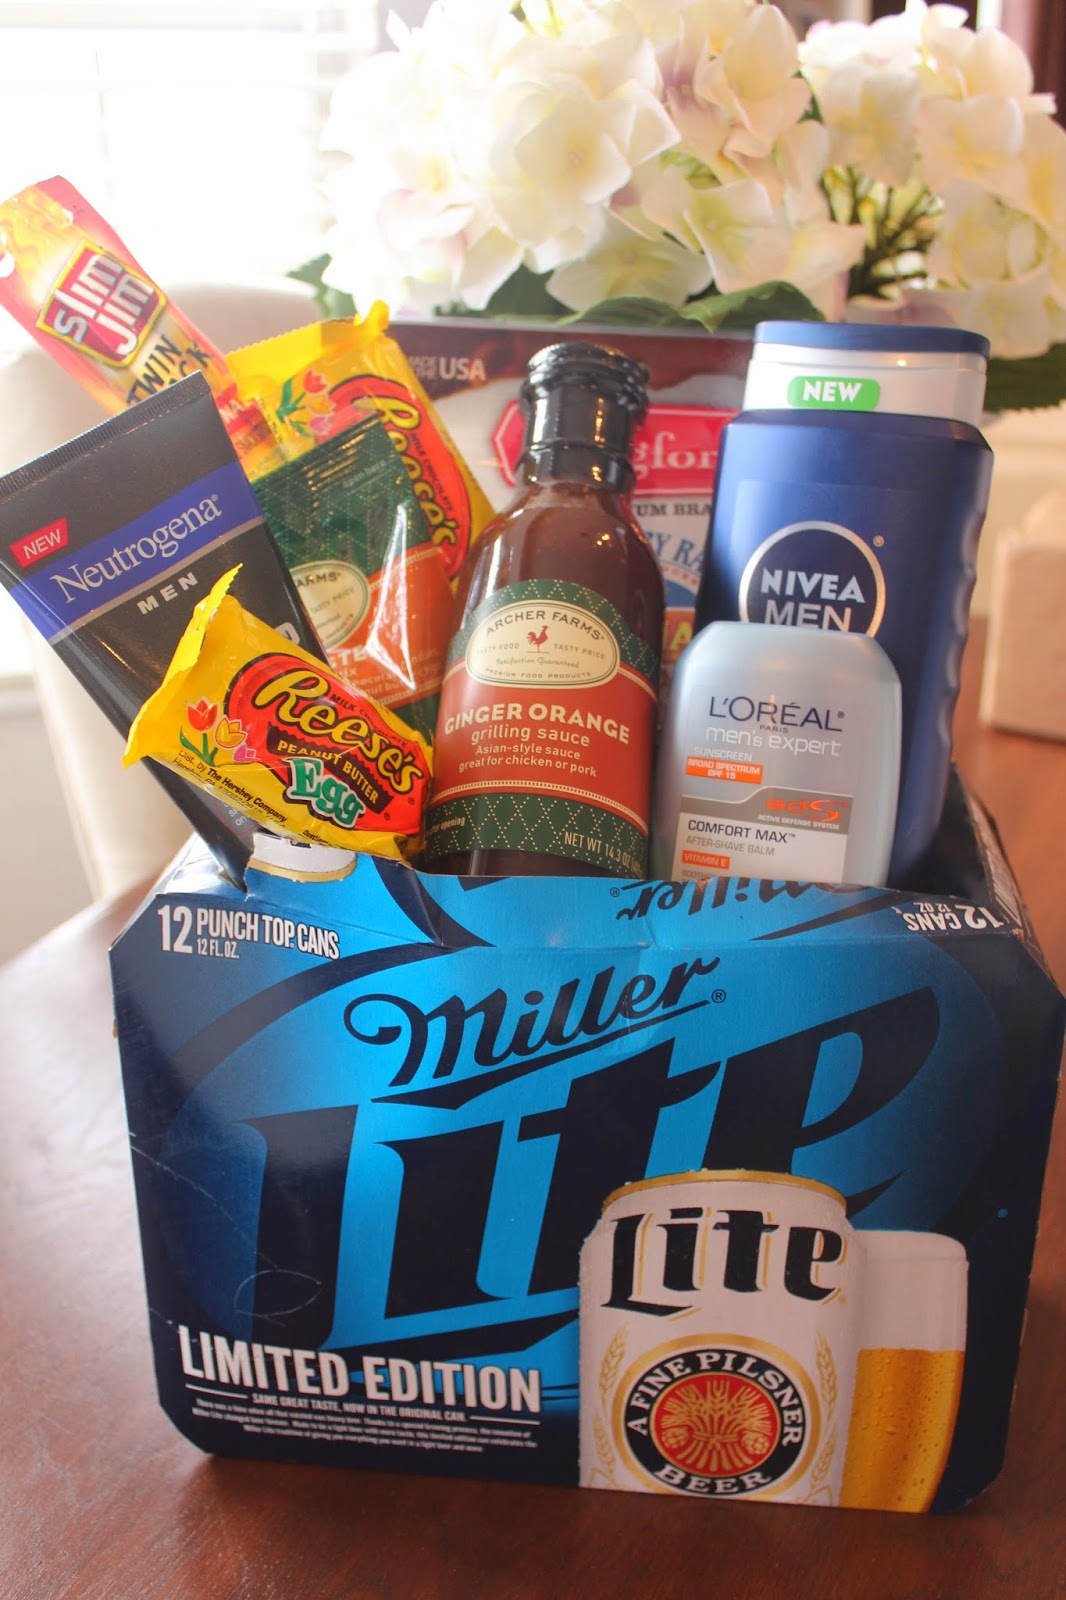
How To: Easter "Man Basket"


If you followed this blog back in 2012 (wow suddenly I my blog feels really old), you may remember this post with the beer basket. You also may remember my terrible writing, design, fonts, etc. It's okay...it's so true. 

What I'm trying to get at is it's definitely time to update that post with this one! It's one of my most viewed posts, and what I take from that is that many of us are clueless as to how we can make unique gifts for the men in our lives. I know I am half of the time, but that's a story for a different day. Personally, I think this gift is fun to put together and is just a small, thoughtful gesture for that special guy in your life. Super easy, too.

I will keep this short and sweet since really this project is pretty self-explanatory and isn't rocket science by any means...

Things You'll Need To Pick Up On Your Next Target Visit:
+12 pack of your man's favorite beer
+Easter grass to fill the inside (I used 2 packs)
+Plastic eggs
+Your man's favorite candies and snack foods
+Your man's favorite shave/face items (because if your man is anything like mine he doesn't buy these as much as he should...cough cough)
+Any other items you think your man will love! (ie: a new flavor of grilling sauce for mine since we are about to get our new grill!)


What You Need To Do:
+Open the beer box from the top, not the sides! Hide the beers somewhere in your house until you can safely put them in the refrigerator without your husband noticing (possibly the day of?) and then cut a large opening in the top of your beer box. 
+Fill with grass, candy filled plastic easter eggs, and some of the other small goodies that fit in the bottom. Save the bigger items to go at the top. 


+Then, without crushing the items in the bottom, start placing the bigger items on top. I actually used a loofah (this works!) to prop the bigger items up on because it helped with the height so that some of the items stuck out of the box more. It's all about the presentation, am I right?
+Use tape, if needed, to secure some of the larger items that might be moving around to the box to keep them in place.
+Admire your latest project, watch your man smile when you give it to him, and don't forget to gift him those beers you hid or put in the refrigerator! I repeat...do not forget the beers. :)

 easter man basket

If you personalize it just for your man, how could he ever not like it? Impossible!

Have you made a basket for your guy before? If not, next year is your time to start. :) Special thank you to those who have actually been reading my blog since 2012 and have continued to stick around! It means so much, truly.

PS-You could also add some small liquor bottles, lottery tickets, or tickets to a sporting event! It would be cute if you taped those on the front of the box! Just some other ideas I've had. You can't go wrong! 

PPS: Billy sent me the link to this article about happy people this morning (we love reading things like this!) and I wanted to share. Happy Tuesday! 

4.10.2014

Gender Reveal Party {Pink or Blue?!}


{dress is from here and only $40! so many cute other options too}

Happy Thursday everyone!

So close to the weekend that I can almost feel it! Dare I say the weather is actually on our side too?! High of 72 today and 72/75 this weekend...hooray! You can guarantee that I will be outside for most of it.

I know that Steph did the recap of her gender reveal party (read here) so I'm going to keep this short and sweet, but I thought it would be fun coming from a different perspective and that I could list some of the sources/inspiration for the party in case any of you will be planning a gender reveal party in the future. You never know! I was lucky enough to be included in planning this party with two of her best friends, Ashley and Brooke, at a local winery.

We wanted the party to have a rustic chic feel, which blended really well with the location, and I think it turned out pretty perfect. Here's the end result with the sources listed at the bottom....


For the chalkboards:
+One for the Old Wives Tales
+One for everyone to "Cast Your Vote" on if they thought boy or girl
+One smaller board with baby Howard's hashtag so you could follow along via instagram (this way friends and family could see everyone's pictures they posted from the party!)


For the BABY letters:
+I bought 4 cardboard letters from Hobby Lobby (they were only $2) and painted them all white. Once they were dry, I glued some blue and pink bows (also from Hobby Lobby) in the corners for an easy tabletop decoration!

For the pink and blue suckers:
+Bought them from Big Dot of Happiness! They have anything you could ever want or need for a baby shower or party like this.
+Blue and pink tissue paper was stuffed down in the mason jars to "hold" the suckers up and tied burlap bows on the front.

Bow and Bowtie Cutouts:
These were so easy and turned out really cute! These can also be used as a cute photo op with your friends and family to symbolize their "guess" of the baby. They are also great because they added some height to the table.
+I just googled bow and bowtie images, printed them out, and used pink and blue cardstock to cut them out (about 15 of each). Then, I bought one pack of the long wooden sticks (from Hobby Lobby) to glue on the back of them. To finish them off, we just placed them in mason jars with fun paper!


I wanted to add something that had a more personal touch and came across the idea on Pinterest (what else?) for a memory book, and knew right away it was what I was looking for. 

I bought this baby scrapbook from Hobby Lobby and filled it with blue and pink card stock paper, with a note in a frame next to it for people to leave a special note to the parents and/or baby. I love that they can keep this and put it in her nursery!


Last but definitely not least...the sweets table. Every party has got to have one....every good one that is. :)

We used these tall glass mason jars and filled them with blue and pink candies (from Party City) and put cute mason jar labels around the top with their name choices. Guests could take home some of the candy using plastic scoops and small plastic bags! 

There was also cupcakes, cookies, and some other bowls with candy spread out on the table that Ashley and Brooke did an amazing job on.  

 Mommy and Daddy to be! 
Beau's sister, Julie, with one her triplet girls! (you can find her blog here)


And as most of you know by now...baby Howard is a GIRL!!
(I think I repeated this maybe 11 times that day, but girl was my guess and it felt SO good to be right! Mainly just because everyone honestly thought it was a boy and because I like to hear Steph say I was right over and over again... ;))


To the Mommy to be-I'm so glad I got to be there when you found out you will be bringing beautiful miss Paisley into the world! I wouldn't have had it any other way, and feel so lucky that I was able to meet all of your friends and family that you've known for years. They made me feel like "one" of them, which I'm so thankful for. I absolutely cannot wait to be an aunt, to support Paisley in every way I can, and to continue this journey by your side! Love you!


12.30.2013

Make A Decorative Tray from a Cardboard Box

jewelry storage jewelry box do it yourself tray perfume bracelets

Oh my goodness.

Yep, going there. Checking in today with one of my favorite projects thus far for an end of the year project. A solution, per say, for all those cardboard boxes you are about to store away, or throw away. 

If you're like me, you might hate clutter and things that take up a lot of space up in your house.  And more often than not you throw away items (in this case: gift boxes) just so it's out of the way and is one less thing to store away for a year. Or, who knows, maybe you are a box hoarder? If you can spare one to make a pretty tray...here's a quick and inexpensive project for you!

Your supply list:
Cardboard box + another piece of cardboard to fit into the bottom of the box
Fabric (I got a yard of this awesome coral print from Hobby Lobby and used a 40% off coupon so this project cost me less than $5.00-if you already have fabric, then this project could be free!)
Hot glue gun
Scissors
What you do:

Find an empty cardboard box of the size you want for a tray. I just used an Express box we had on hand. I would try and use the sturdiest box you can find so that the sides of the tray stay put and that it's not very flimsy.

Add tape around the sides and corners for extra support... 


Cut another piece of cardboard to fit in the bottom of your tray. You want the finished piece to fit nicely inside the bottom of the tray. Cut a piece of fabric about 1/2" bigger on each side than the piece of cardboard you just cut and use your hot glue gun to fold and seal the fabric on the back:
 

For the fabric on the box, you just want to cut pieces of fabric that are long enough to go around all four sides of your box. Make sure it's wide enough and add a little extra room for the bottom of the tray:


Now all you have to do is hot glue the fabric all around the bottom of the box using that 1/2" seam allowance you allowed for. Fold the corners as you go around it and hot glue them. Then, your box will start looking a little bit more pretty...


Your last step is just popping the already finished piece into the bottom of the tray. Bam...you've got yourself a brand new tray to store anything you'd like!


These trays are so awesome because you can never have enough of them. You can literally store anything and everything on them. I wanted one for all my bracelets so that I could see and access all of them easily, but you can use this for perfume, watches, etc.

So if you're looking for an easy project and you have 10 minutes and $5.00 to spare, you too can have yourself a pretty tray. It's that easy, trust me.

And because I love me a good tray like I said above, you shouldn't be surprised that I have another tray tutorial using a shadow box picture frame if you're interested.

12.03.2013

Top 3 Holiday Recipes and Crafts


Christmas is sneaking up on us, isn't it?

Normally around this time, and I hate to admit to this, I'm just getting around to buying all of my gifts. This is just hard for me to wrap my mind around because in all other aspects I am such a planner! However, this year I am almost done with all of my Christmas shopping already and it feels oh sooo good. Now I know why people shop and plan so early...it feels great! Heck, I feel like I could train for a marathon and be ready for it come Dec. 25th. Maybe. Just maybe...

Now I just need someone willing to wrap all my gifts (not lying-I dread this every.single.year. I'm terrible at it...) Any takers? ;)

Today, I thought I would re-post a list of my top 3 favorite crafts and recipes that I featured last year (candy Buckeyes, anyone? take my word for it: MAKE THESE) for anyone who missed them or is just looking for some ideas this month! I got some questions about the tree skirt I made featured in my post yesterday, so I will include a link for that as well. 

oreo cookies christmas cookies cookies

I make these for our annual cookie exchange with my Mom's family. 10 dozen to be exact. They are a big hit with everyone and are surprisingly really easy to make. 

If you are looking for an easy, unique but delish cookie to bring to a family party (or to make if you are hosting!)...these little guys are your secret weapon.


 A year later, this wreath is still holding up fantastic for me. I love that I can use it year round on our front door!

candy buckeyes
 {the holy grail in my recipe book}

Who would've thought that this would be one of my most pinned recipes on Pinterest and one of my highest viewed posts?! I definitely didn't! But this makes me smile so much. These are actually made year round around these parts, but they are perfect for the holidays too. You simply cannot go wrong with peanut butter and chocolate rolled up into one. You'll thank me later. 


And here is the link for our tree skirt that I made...

tree skirt

Happy crafting / baking!

What is your favorite holiday craft or recipe? Share the link with me so I can find some new ones!

11.19.2013

Friendsgiving {+DIY Hot Cocoa Mix In A Jar}


I'm about to get you a. really excited for Thanksgiving and b. really hungry....


Last year, I went over all the reasons why you should have a Friendsgiving, even though none are really needed because I think that everyone needs Thanksgiving more than one day per year. It's so much fun to have all of your closest friends together and eat all of your favorite foods, am I right? For our Friendsgiving, each couple or single offered to bring a different dish (or even two!) and then we provided dinner rolls, dessert, drinks, etc. on top of that. If you want a recipe (literally) for a good time, get your friends together at someone's house and do this.

It was so good that I didn't get many pictures of the whole event. I was just really in the moment enjoying the time we had together. Or you could blame it on the third helpings that I had...whichever.  I did get a few though of our awesome turkeys and I took pictures of the "favors" I made everyone. The boys deep fry the turkey and they did two turkeys this year. They put a cajun seasoning on top and I swear to you that everyone loves it. They say it is the best turkey they have ever had. If you have never had deep fried turkey before, you should! 


As for the favors, my checklist for these was something like this: Something everyone could easily bring home. Simple. Cute. Practical. Yummy. 

Enter....
hot cocoa mix

How you do it: It's pretty simple. Just buy your favorite hot cocoa mix, mini marshmallows, mini chocolate chips, and Andes peppermints and layer them all in a mason jar. I didn't measure anything out really, except I put about a cup (or a little more) of hot cocoa in each. This will make around 8 servings or so of hot cocoa.


Good ole mason jars..always pulling through with the best ideas for me (you too Pinterest). Feel free to steal this idea and make some for your friends for the holidays!

Last but not least, for some reason I found this picture to be hysterical-baby in ghost chair? so posh!


2nd annual Friendsgiving...SUCCESS!

Have you ever done this with your friends? If not, what are you waiting for? :)