Showing posts with label tutorial. Show all posts

4.22.2014

How To: Easter "Man Basket"


If you followed this blog back in 2012 (wow suddenly I my blog feels really old), you may remember this post with the beer basket. You also may remember my terrible writing, design, fonts, etc. It's okay...it's so true. 

What I'm trying to get at is it's definitely time to update that post with this one! It's one of my most viewed posts, and what I take from that is that many of us are clueless as to how we can make unique gifts for the men in our lives. I know I am half of the time, but that's a story for a different day. Personally, I think this gift is fun to put together and is just a small, thoughtful gesture for that special guy in your life. Super easy, too.

I will keep this short and sweet since really this project is pretty self-explanatory and isn't rocket science by any means...

Things You'll Need To Pick Up On Your Next Target Visit:
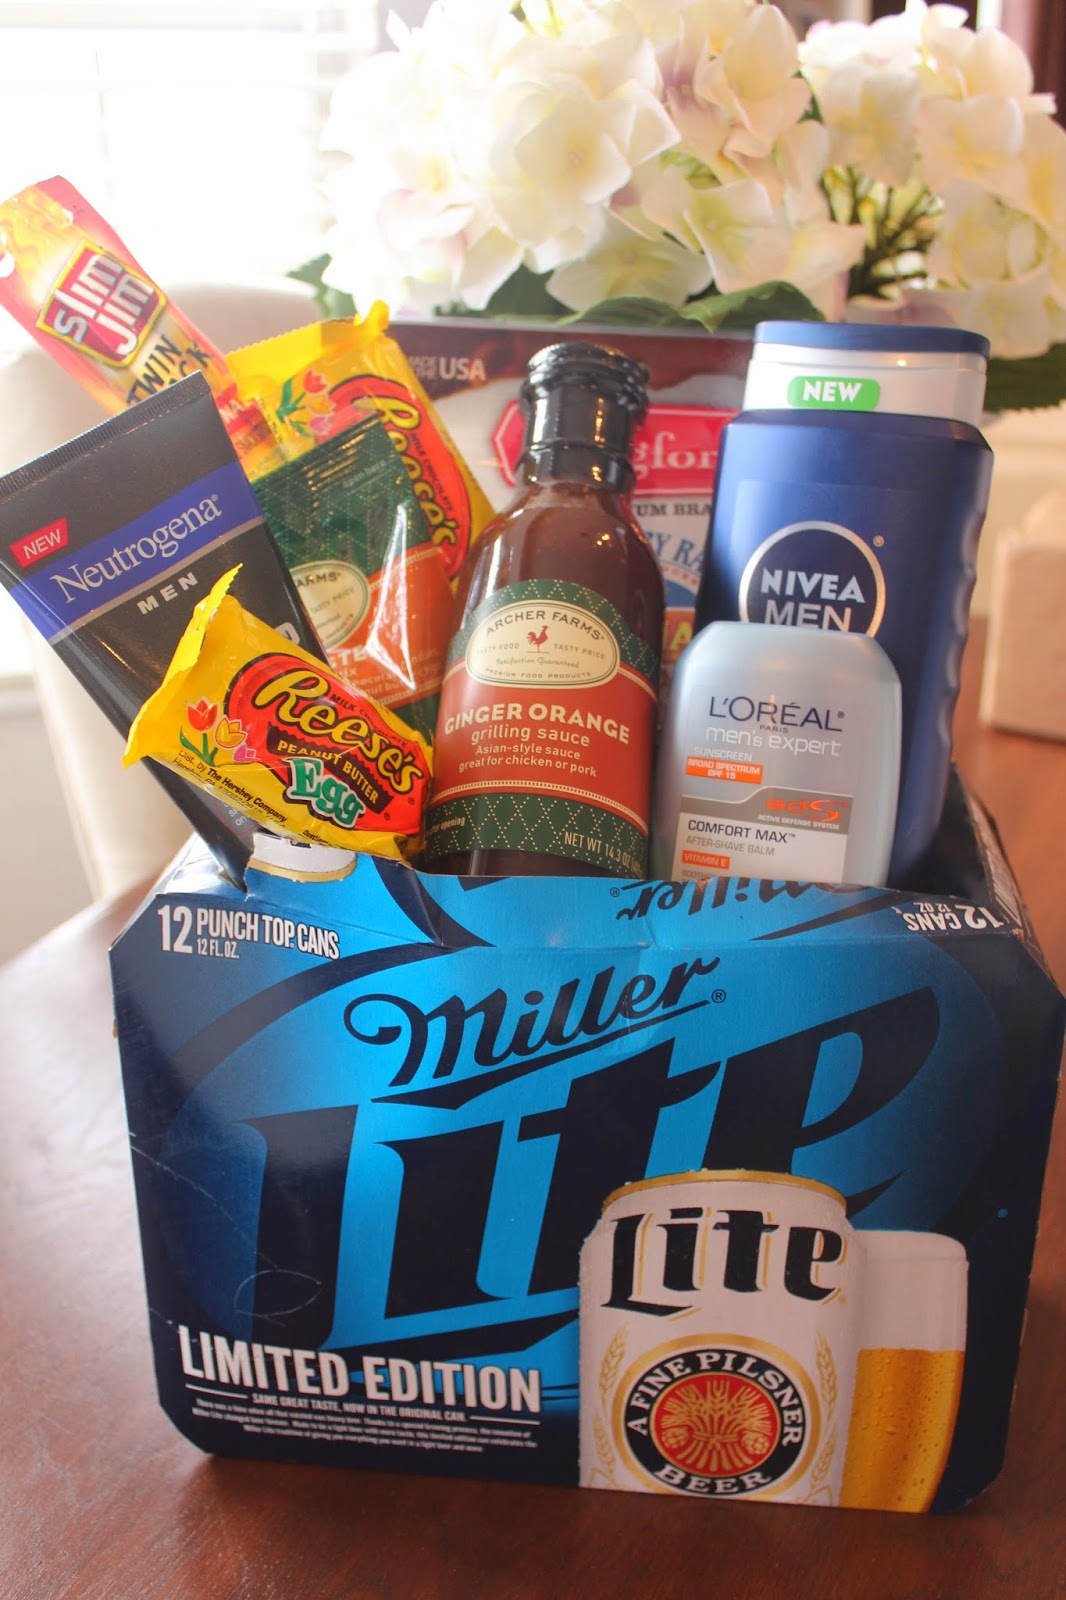
+12 pack of your man's favorite beer
+Easter grass to fill the inside (I used 2 packs)
+Plastic eggs
+Your man's favorite candies and snack foods
+Your man's favorite shave/face items (because if your man is anything like mine he doesn't buy these as much as he should...cough cough)
+Any other items you think your man will love! (ie: a new flavor of grilling sauce for mine since we are about to get our new grill!)


What You Need To Do:
+Open the beer box from the top, not the sides! Hide the beers somewhere in your house until you can safely put them in the refrigerator without your husband noticing (possibly the day of?) and then cut a large opening in the top of your beer box. 
+Fill with grass, candy filled plastic easter eggs, and some of the other small goodies that fit in the bottom. Save the bigger items to go at the top. 


+Then, without crushing the items in the bottom, start placing the bigger items on top. I actually used a loofah (this works!) to prop the bigger items up on because it helped with the height so that some of the items stuck out of the box more. It's all about the presentation, am I right?
+Use tape, if needed, to secure some of the larger items that might be moving around to the box to keep them in place.
+Admire your latest project, watch your man smile when you give it to him, and don't forget to gift him those beers you hid or put in the refrigerator! I repeat...do not forget the beers. :)

 easter man basket

If you personalize it just for your man, how could he ever not like it? Impossible!

Have you made a basket for your guy before? If not, next year is your time to start. :) Special thank you to those who have actually been reading my blog since 2012 and have continued to stick around! It means so much, truly.

PS-You could also add some small liquor bottles, lottery tickets, or tickets to a sporting event! It would be cute if you taped those on the front of the box! Just some other ideas I've had. You can't go wrong! 

PPS: Billy sent me the link to this article about happy people this morning (we love reading things like this!) and I wanted to share. Happy Tuesday! 

2.17.2014

How-To Edit Your Instagram Pictures


What did we do before Instagram? Honestly! It's the one app that I am consistently checking and the one I seem to get the least annoyed with.

I've always been one of those girls that takes a crazy amount of pictures, even long before the Instagram or Facebook days. Guilty as charged. I love photography, even though I'm not an expert by any means, and I love seeing what pictures other people are taking. Pretty pictures are just fun to look at, especially when you can see pictures from all around the world in a simple click (one of my favorite hash tags to search on insta? #travel) One thing that I am knowledgeable about is staying up to date with the best photography apps. I'm always looking in the iPhone app store at the best up-and-coming photography apps to see what is out there, how I can make my pictures better, and what app everyone is raving about.

When I first started using Instagram, it seemed like I was always picking a filter with a border (borders? oh, fun!) and I chose a lot of the darker filters that Instagram provided. Now I find that I'm doing the complete opposite...I gravitate towards the lighter filters (Nashville is a favorite) and I never use a border. I like to try and keep the picture as natural as possible, but while still adding something extra to it in one way or another. I don't use a border anymore because I found when I went back to print one of my older pictures or use it for something, I hated having it on there and it got in the way.

So, without further adieu, here are some of my favorite ways to edit your Instagram pictures with your iPhone! Please share in the comments below what apps you like to use, I love to hear what you all are loving as well!

>>Once you have the image you want, take advantage of the "enhance" feature on your iPhone. 9 times out of 10 I will use this feature because it makes the photo look more sharp or crisp, but there are times it can pull some off coloring so if it does I won't use it in that circumstance.


>>Open the app Afterlight. Afterlight is my favorite editing app. With an iPhone, it's hard to get the right amount of light for a picture and you might find yourself with a handful of dark pictures. With this app you can add brightness, light leaks, adjust the exposure, add a unique filter, or crop. Not only that, it hardly ever crashes and it's fast.

original image of our kitchen before afterlight
image after editing in afterlight (adjusted the brightness)
 Our kitchen has a lot of natural light already, but my iPhone picture still came out a little darker than I wanted. Just adjusting the brightness is an easy editing tool that can make your picture better!


>>If you have a horizontal or vertical picture that looks better in it's original size, Whitagram is the app for you. It allows you to keep your original photos size and gives your pictures a pretty white background. You can see an example of this on my instagram page, as showing it on this post you won't be able to tell.


>>Are you looking for more filter options than what Instagram has to provide? Camera + is where it's at. This is the app that I have had on my phone for the longest period of time and I'm so glad I found it. It does so much that I couldn't begin to explain it all to you, but my favorite features? It has a timer for those situations where you don't have anyone to take your picture, it has a "flash" and "backlit" option for those extremely off or dark photos, and the filters are awesome.

Some of my favorite filters (featured in above photo): Hipster, Auto (it just makes the colors pop more), Vibrant (I use this when I'm traveling-it's great for beach/sky shots!), Sunkiss'd, Black and White, Lofi...to name a few.

this photo's colors were already amazing on it's own but after adding only a little bit of the vibrant effect with Camera +(you can adjust how much you want), it made the colors..you guessed it..more vibrant..
 picture of Rocky after using the auto effect (it makes his tie and coloring stand out more)


>>Want to know how everyone adds fun text or cool graphics? Download A Beautiful Mess or Rhonna Designs. A Beautiful Mess has a ton of phrases, arrows, symbols, and text fonts you can add to a picture but beware that this app takes a lot of storage space!

text/graphics after using ABM


>>Do you want to showcase more than one photo at a time? PicFrame gives you the ability to create a photo collage (you can fit up to eight photos for one Instagram pic) and you can also add text.


These are the apps that I'm using on a regular basis and have passed my photo editing "test". Some of my other favorite editing apps out there that are worth checking out:

+Perfect365 (for face touch-ups!)
+Aviary
+Snapseed
+Vintique

Phew! After all that and multiple copies of the same picture taking up space on my camera roll, I just MIGHT be ready to finally upload to Instagram. :)

What are your favorite editing apps? Leave it in the comments below and don't forget to follow me, @katiewkrysh, if you aren't already!

Happy Monday friends!

9.24.2013

Tutorial: How-To Renew Your Blog Domain!


Have you ever got the dreaded emails from Google saying, "please log in to your account and update your payment information. If you take no action, your domain will not be renewed"?

Well, it looks a little something like this...
 

My blog won't be renewed?! Is that what you just said? MAJOR YIKES.

You would think that this would a 3, maybe 5, minute task at the most, right? Just let me go in, update my payment information, pay for another year and I'm all set....

WRONG.

Oh-so wrong.

The reason why I created this tutorial is because of how hard they have made this process to be and because of all the other bloggers I have heard that have had the same problem. Some have even lost their entire blogs due to this. Hopefully I can help some of you with this!

If you haven't got these emails yet, your turn is probably coming, so Pin this tutorial (or bookmark-whatever you fancy) to save for the future!


Step 1. Go to admin.google.com

>>this is where it's tricky and was causing me all the problems. You are signing in under a different account-NOT what you use to log into your Gmail/Blogger accounts. So click where it says, "sign in with another email address".

The username (in most cases) will be: yourname@yourdomain.com. For example, mine is: katie@mykeepcalmandcarryon.com. Apparently, when you set up your blog this separate account was created, but obviously a lot of us can't seem to remember this. My password ended up being the same as my Gmail password. If you can't figure out your password, you can hit "can't access my account" to reset it.

Step 2. Once you are logged in > go to the Billing tab > then to the RIGHT under "Domain Registration" there is a "$" symbol that says "Verify billing information". Click this. Then click "Billing Settings" on the left hand side and update your payment information. I put in two forms of payment just to be sure.

NOT DONE YET.

Step 3. This is so important! Click to go back to the Billing page, or "back to subscriptions" it might say, and hit the "+" sign to the LEFT of "Domain Registration". Under Renewal Options, hit CHANGE then "AUTO-RENEW MY CONTRACT".

Now every year it will be set up to automatically renew. If you have to go in and update payment information in the future, this is how you would do so.

A saint lovely man named Alan, from Google Support, actually called me to verify that this was all correct and I kind of want to send him a Christmas present for going over all this and reassuring me that I am good to go. He told me this is such a big problem and he personally is sorry for all the troubles it's caused me and my blog friends (ha)...see? Man deserves a Christmas present. Where are all the other Google support peeps?!

I hope this tutorial helps some of you and you are able to update your blog domain without any problems in the future. This also means that in return I get to keep reading your awesome blogs and that makes me pretty happy.

Over and out,

**UPDATE: This is just for domains registered with Google! Also, as much as I would like to be able to help each person's unique situation or problem, I simply don't have the time to do so. If you have followed these steps and still are experiencing problems, I have had success with Google's support department. I would suggest sending them an email (found on the same screens where you are trying to log in) and they typically respond within 24-48 hrs. Thank you!


6.06.2013

SPD: WOOD PALLET SIGN {COTTAGE LIVING}


Hap hap happy SPD day! Back for another round.
And I hope you (yes, you) will join us! If not this week, then definitely next week. What do you say?

I have to admit I'm still a little distracted by the CMT awards last night. Florida Georgia Line swooping them up left and right made me happy. I know my co-host would agree. 

Anyways....I'm pretty excited for this weekend to get here! I've mentioned before that Billy's parents have a boat and we typically travel to Billy's grandparents cottage in Port Clinton on the weekends in the summer a lot and this weekend will be our first weekend there so far this summer! We are so excited. Lake living is just better, isn't it?

His family has spent some time this year re-doing the bedrooms at the cottage and Billy's mom asked me if I would make a sign for over one of the beds with a wood pallet, kind of like this one I made two years ago. Of course I told her yes....

Wood? Lake inspired? Paint? Where do I sign?

I think many people assume wood pallet projects are really hard to do. THEY AREN'T-don't let them fool you! I found inspiration from this awesome sign...mainly just the size and yellow color on it. The last wood pallet I made that hangs in our guest bedroom, I didn't paint the wood at all like this one. We left it distressed which is also a great look... 


 via

This time, I wanted to switch it up and actually paint the wood to go with the color scheme in the bedroom. Here's what I did....

Supplies:
-Wood pallet {honestly, you can find these at hardware stores and if you ask they may give them away for free like ours did!}

-Screws
-2 1x4 pieces of wood
-Chalk, optional
-Acrylic paint in the color(s) of your choice

-Small foam paintbrush

What You Do:


1. Get your wood pallet and remove any screws or boards that don't "look" good. Place the boards you do want to use from the pallet together and have your spouse, boyfriend, or Dad (or yourself!) nail the boards together to stay in place. For this project, I used 6 of the boards from our pallet. It's a perfect size to go over a bed or for a statement piece in a room...


silly me, I forgot to take a picture before painting the wood a light grey. Try and picture without for now...
 

2. Once the boards are secure, screw the 1x4's on the back to secure the boards even more and to help with hanging. Like this....


3. Get to painting! I painted the wood Silver Spoon (light gray) by Behr. 


4. Once that coat dries (only needed one-the wood soaks up the paint so well!), think about the quote you want to paint on your board and paint that. Since this is for the cottage, I thought I would do a nautical inspired quote or something about boating. I chose yellow and a dark blue because it will match the colors in the bedroom that it's going in...

You can practice writing your quote with chalk or a pencil before painting it. I, however, this time chose to wing it (REBEL). You can also buy stencils if you think you have bad handwriting or will mess up, but I wasn't able to find stencils big enough for what I needed. 


Here's how it turned out...keep in mind it still isn't hung yet (obviously) so just do me a favor and picture it in a beachy cottage?


To hang the sign-we just use a strong and very durable wire that you can attach to the back on the boards and then use nails to hang. I'm sure there are other ways to do this, but it has worked well with the one we have hanging in our guest bedroom. 

Wood pallet projects are so fun because you can literally paint anything your heart desires on them! Have fun with them and get creative.

And this project was pretty much F-R-E-E. That always equals amazing, right? 

Have you ever made a wood sign like this before? How'd I do? My handwriting isn't the best, but I think it looks pretty decent for a non-professional like myself, haha. Once we get the sign hung, I will share on instagram (@katiewkrysh) and on here to show you all what it looks like! Excited to get it up :)

Like I always say (well, when they are successes!): Katie tested, Pin APPROVED!

It's your turn now! Come join in on the fun....
Please follow these simple rules:
+Link up using the linky tool below.
+Link back to Steph and I's blogs in your post (be kind!), so other people can know about the link up!
+Visit other blogs to get new inspiration and find new friends.


3.21.2013

SPD: DIY $5 ACRYLIC TRAY TUTORIAL


This is another one of those projects that made me feel slightly stupid go "ah HA! Why didn't I think of this sooner?"

They sell these trays for $40 and up, but today I have an easier than easy tutorial to make one yourself for under $5.00.

The best part about it, imo, is that since you pick the card stock that goes on the bottom of the tray, that means you can swap it out whenever you want to a different color or pattern. Maybe I like this fact because I'm so indecisive and change my mind every other week, not too sure.

Here's your supply list:


I can't tell you how many times I've seen these picture frames/shadow boxes at Michael's and never once thought to turn it around the other way and make it into a tray. 

Have any of you?

Mind = blown.
(doesn't say much about me I guess, but that's why I'm here. A Pinterest addict.)

This is honestly the easiest project, if you can call it that, that I've done.
My inspiration came from this pin.

It's as easy as....
1, 2, 3
1. Pick out your card stock for the bottom
2. Cut it to fit the size of your tray
3. Place in tray 
(you can secure with tape if you want, but the objects on the tray will also hold it down)

Final outcome?
$35 dollars in your pocket and a beautiful tray to house some of your favorite things.

Oh, and they have a bigger size as well if you want a bigger tray!

Since I already use one for my watches in our bedroom, 
I decided to use this one for a side table to hold odds and ends, like so....


candle: bath and body works (go buy this NOW!) / nail polish: loreal "orange you jealous?"
 bracelet: styleloveliving / gold urchin: target

What do you think? 
I would be flattered if you pinned this to share or save for later use! Just sayin'.. :)

I'm ready to buy another to use in another room in our house. 
Trays make things look a lot neater/more put together than they really are...or is that just me?

*UPDATE: a lovely reader also suggested if you want to make it more fancy, take it to Staples or somewhere to have it laminated. Great tip! 

Your turn to link up!
Can't wait to see what you did this week.

the fine print:
+Link up using the linky tool below.
+Link back to Steph and I's blogs in your post (be kind!) so other people can know about the link up!
+Visit other blogs to get new inspiration and find new friends.


3.14.2013

SPD: The Cutest Housewarming You Ever Did See....


What kind of best friend would I be if I didn't punk do a SPD project for my co-host WHILE at her house?!

Not a very good one! 

This had my name written all over it and aside from traveling with a giant tub, which is so not easy, and delicate looking "cupcakes" (that double as washcloths), I think it turned out so cute! It's such a creative and fun gift to give your friends as a housewarming gift...at least I like to think so (hoping I don't hear silence on this one). I got the idea for the housewarming "basket" (mine is a polka dot tub from TJ Maxx..seriously couldn't pass this up) from this pin and I followed this tutorial for the washcloth cupcakes.

Most of you know already, but for those who don't, we were so excited for Steph and BBFT because they just moved into their beautiful new casa a couple months ago (so so so happy for them!) and I have been waiting to give them a housewarming gift until we would be in person. Ya never know if anthrax would get in the way by sending it in the mail. That's old and done, right?

Steph sent me a billion and one pictures, but no amount of pictures was comparable to actually seeing it in person and spending time with them in it. NOTHING. The caps mean I'm really serious about this if you couldn't tell..

I'm not exaggerating when I say that Steph and BBFT are the greatest hosts in the whole world. You might think we want to go back and visit because we are best friends, but really it's just because we want to be their house guests every week we possibly can. I mean I already asked them to get ready to take off work next week (I WISH!)

When we arrived at their house in Texas (but not before they insisted we try Whataburger and yours truly downed her first cheeseburger in almost 2 years..WHAT? Why do we not have this fast food in Ohio?!), they had chalkboard signs waiting for us, Texas shaped rice krispie treats out on the counter (girlfriend knows my hunger level after a flight), and the entire fridge stocked with booze. They even had some gifts waiting for us in the Krysh Wing (our room/upstairs loft where we stayed)....

and I was so happy to find a picture of the four of us in our room from our first trip together in Naples, the cutest Texas shirts (just look at mine below..I'm going to wear it daily), cups, and koozies!


OK, back to the housewarming gifts. I could probably spend all day talking about our first night at their house...like the animal heads that they "surprised" me with behind the couch that I wasn't expecting to see so inevitably I screamed my head off like a normal person, how late we stayed up talking and boozing, and how it was the greatest thing ever to be able to walk downstairs in the morning and jump in bed with Steph and Beau to cuddle. It's acceptable to do things like that with us and I think BBFT is just used to us doing things like this by now. But I won't get into all that right now ;) Anyways....

How to make a housewarming basket:

-Pick out your favorite tub/basket to use as the holder of the gifts
-Find cute household items or accessories to arrange inside the tub. At the bottom of the tub, I put the bigger items (like a mason jar candle, some wine toppers, and a cupcake decorating kit) so that the small items at the top could just lean against each other. The other items I included were: cute pink garden shears for Steph, measuring spoons, pink spatula's/spoons, a small little vegetable brush (for our juicing!) and a small whisk.
-I attached a small colorful cutting board with tape to the bottom of the basket as the stand
-This step is optional but I liked making it a little bit more fancy: I bought a plastic gift bag to go around the tub and smacked a big bow at the top!


I also added a gift for their little puppy (who they are picking up this weekend!) because I really want to be her favorite aunt. I got her a Buckeyes (had to...) tennis ball and a fur mom cup for Steph.

Turned out pretty cute if you ask me!

Next up are these adorable washcloth cupcakes.

How to make washcloth cupcakes:


-6 pack of washcloths (you can use kitchen towels as well I believe)
-Red and green cardboard paper
-Ribbon
-Cupcake liners
-Toothpicks

What you do:

-To make "cherries on top" for the cupcakes (you can always skip this part but I think it looks super cute), I just cut out small red circles and taped little stems made from green paper to the top of each of them. Then, I used tape to stick them on the top of a toothpick so that the toothpick can slide down into the washcloth.


-Next you will want to take your washcloths and lay them out unfolded. Fold them in half once, then in half again. Then you simply roll the left corner of the washcloth down and continue rolling then secure bottom portion tight with a ribbon. 

-Place washcloth in colorful cupcake liner (you can tape the bottom to get them to stay!)


There you have it...
you will get the award for cutest and most creative housewarming gift from your friends!
Right Steph?
 
Tomorrow...
 it'll be time to share ALL about meeting all of Steph's friends, Beau's family,
the best place ever known as Top Golf, and finally getting to meet 2 other cutie bloggers-Kristen & Shay! I'm excited already.

What did you make this week?
Link up with us why dontcha?